အင္တာနက္အသံုးျပဳတဲ့ပုဂၢိဳလ္တုိင္းေတြ႕ၾကံဳရတတ္တဲ့ျပႆနာတစ္ခုကေတာ့ မိမိအသံုးျပဳေနတဲ့ဘေရာက္စ္တြင္ မလိုအပ္
ေသာ ေၾကာ္ျငာ (Advertising Page) စာမ်က္ႏွာအလိုေလွ်ာက္ပြင့္လာျခင္းျဖစ္ပါတယ္။ အဲဒါက Pop-up Ads လို႔လဲေခၚ
ပါတယ္။ ဒီ Pop-up Ads စာမ်က္ႏွာေတြပြင့္လာေသာအားျဖင့္ အက်ိဳးသက္ေရာက္မႈေတြကေတာ့ အင္တာနက္ေပၚမွ
Malaware, Adware လို႔ေခၚတဲ့ ဗိုင္းရပ္စ္ေတြဟာ မိမိစက္ကိုလာေရာက္ေႏွာင့္ယွက္ႏိုင္တဲ့ျပႆနာလို႔သေဘာေပါက္ရမွာ
ျဖစ္ပါတယ္။
ေနာက္ျပီးမိမိစက္ကေလးလံေနျခင္း၊ ဘေရာက္စာမ်ားခဏခဏဂ်န္းျဖစ္ေနျခင္းစသည္တို႔လည္း ၾကံဳရမွာျဖစ္ပါတယ္။
အထက္ပါဗိုင္းရပ္စ္ရဲ႕လကၡဏာမ်ားမွာ...
၁။ မလိုအပ္ဘဲ မိမိကြန္ပ်ဴတာတြင္ အလိုအေလွ်ာက္ ၀င္ေရာက္လာျခင္း
၂။ တစ္ခုထက္ပိုေသာ application မ်ား အလိုအေလွ်ာက္ထည့္သြင္းျခင္း
၃။ မိမိ application (ဘေရာက္စာ) အသံုးျပဳေနစဥ္အတြင္း ေၾကာ္ျငာ (Pop-up Ads) စာမ်က္ႏွာပြင့္လာျခင္း
၄။ တစ္ခုထက္ပိုေသာ Pop-up Ads ေၾကာ္ျငာစာမ်က္နွာမ်ား ပြင့္လာျခင္း
၅။ အင္တာနက္အသံုးျပဳေနစဥ္အတြင္း မလိုအပ္ဘဲ ေဒတာမ်ားေဒါင္းလုဒ္ေစျခင္းႏွင့္ အျခား အသံုးသူမ်ားထံပို႔ေပးျခင္း
၆။ ထိုပရိုဂရမ္၊ ေဒတာမ်ားကို Uninstall လုပ္ရန္ခက္ခဲျခင္း တို႔ျဖစ္ပါတယ္။
အထက္ပါျပႆနာကို ေျဖရွင္းႏိုင္တဲ့နည္းလမ္းအက်ဥ္း...
STEP 1: Uninstall Pop-up Ads malicious programs from your computer
STEP 2: Remove Pop-up Ads from Internet Explorer, Firefox and Chrome
STEP 3: Remove Pop-up Ads adware with AdwCleaner
STEP 4: Remove Pop-up Ads browser hijackers with Junkware Removal Tool
STEP 5: Remove Pop-up Ads virus with Malwarebytes Anti-Malware Free
STEP 6: Double-check for the Pop-up Ads infection with HitmanPro
အထက္ပါနည္းလမ္းမ်ားတြင္ က်ေနာ္အေနနဲ႔ နည္းလမ္း (၃)မ်ိဳးကိုသာ အသံုးျပဳျပီးေျဖရွင္းသြားမွာျဖစ္ပါတယ္။ အဲဒီ (၃)မ်ိဳး
နဲ႔လဲေျပလည္သြားႏိုင္ပါတယ္။ တစ္ခါတစ္ေလ Malwarebytes Anti-Malware Free ဆိုတဲ့ ပရိုဂရမ္တစ္မ်ိးကိုအသံုးျပဳျပီး
Pop-up Ads ျပႆနာအတြက္ေျပလည္သြားႏိုင္ပါတယ္။ ကဲ စၾကရေအာင္...
နည္းလမ္း (၁) Uninstall Pop-up Ads program from your computer
Control Panel> Programs and Freatures ကိုသြားျပီး မလိုအပ္ေသာ (အတိအက်သိေသာ) ေၾကာ္ျငာ ပရိုဂရမ္မ်ားကို
Uninstall လုပ္ပါ။
နည္းလမ္း (၂) Remove Pop-up Ads from Internet Explorer, Firefox and Chrome
Remove Pop-up Ads from Internet Explorer
၁။ Internet Explorer ကိုဖြင့္ျပီး, click on the “gear icon”
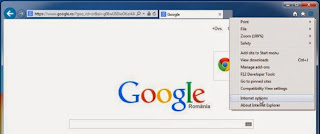
၂။ “Internet Options” တြင္ “Advanced” tab ကိုႏွိပ္ျပီး “Reset” button ကိုႏွိပ္ပါ။
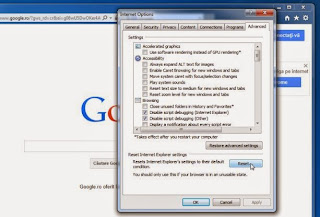
၃။ “Reset Internet Explorer settings” တြင္ “Delete personal settings” ေဘာက္စ္ကို အမွန္ျခစ္ပါ, ျပီးလွ်င္ “Reset” button ကိုႏွိပ္ပါ။
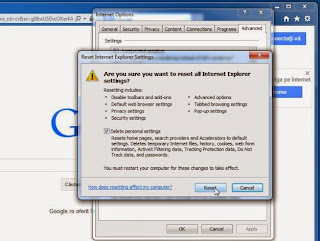
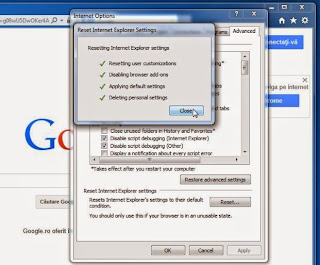
၄။ ေနာက္ေဘာက္စ္ေပၚလာလွ်င္ “Close” ကိုႏွိပ္ပါ. browser ကိုပိတ္ျပီး Internet Explorerကိုျပန္ဖြင့္ပါ။
Remove Pop-up Ads from Mozilla Firefox
၁။ Firefox menu button ကိုကလစ္လုပ္ပါ။ ထိုေနာက္ “Help” ကိုႏွိပ္ျပီး Troubleshooting information ကိုဆက္ႏွိပ္ပါ။
၂။ ထိုေနာက္ “Reset Firefox” ကိုႏွိပ္ပါ။
၃။ ေနာက္ေဘာက္စ္တြင္လည္း “Reset Firefox” button ကိုပဲ ဆက္ႏွိပ္ပါ။
၄။ Firefox browser က ေအာ္တိုမက္တစ္အလိုအေလွ်ာက္ပိတ္ျပီး revert to its default settings ခ်ိန္းသြားပါလိမ့္မည္။
၅။ အားလံုးျပီးလွ်င္ “Finish“.ကိုႏွိပ္ပါ။
Remove pop-up ads from Google Chrome
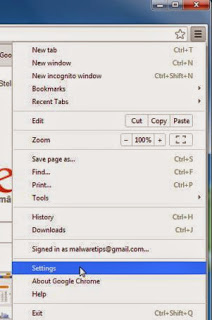
၁။ Chrome’s main menu button ကိုကလစ္ႏွိပ္။ horizontal lines တြင္
 ကိုႏွိပ္ပါ။
၂။ ထိုေနာက္ option labeled Settings ကိုေရြးျပီး
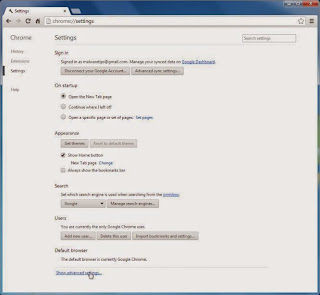
၃။ Chrome’s Settings တြင္ Show advanced settings ဆက္ႏွိပ္ပါ။
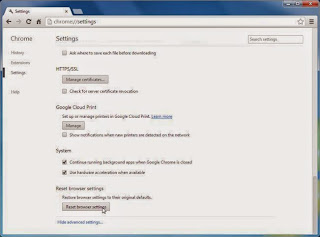
၄။ Chrome’s advanced Settings တြင္ Reset browser settings button ကိုႏွိပ္ပါ။
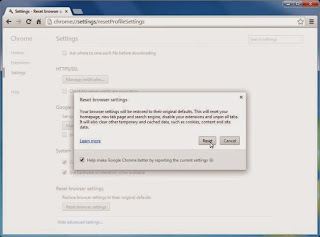
၅။ ထိုေနာက္ confirmation dialog ေဘာက္စ္ပြင့္လာလွ်င္ Reset button ကိုဆက္ႏွိပ္ပါ။ ဒါဆို အားလံုးျပီးပါျပီ
နည္းလမ္း (၃) Remove Pop-up Ads virus with Malwarebytes Anti-Malware FREE
အခုေနာက္တစ္ဆင့္ေျဖရွင္းနည္းကေတာ့ Malwarebytes Anti-Malware အသံုးျပဳျပီးေျဖရွင္းတဲ့နည္းပါ။ အထက္ပါအခ်က္ေတြ
ကိုရႈပ္တယ္လို႔ထင္လွ်င္ ဒီ Malwarebytes Anti-Malware ကိုသာအသံုးျပဳျပီးေျဖရွင္းပါ။ က်ေနာ္ကေတာ့ ဒီနည္းကိုပဲအသံုးျပဳ
တယ္။ အဆင္လဲေျပတယ္။
၁။ Malwarebytes Anti-Malware ေဆာ့ဖ္၀ဲကိုအရင္ေဒါင္းလိုက္ပါ။ ဖရီး၀ဲယားပါပဲ။ Download : Malwarebytes Anti-Malware ၂။ ၎ေဆာ့ဖ္၀ဲကို အင္စေတာထည့္သြင္းရန္ ေအာက္ပါပံုအတိုင္းအဆင့္ဆင့္လုပ္ေဆာင္ပါ...
- When the installation begins, you will see the Malwarebytes Anti-Malware Setup Wizard which will guide you through the installation process.
![Malwarebytes Anti-Malware Setup Wizard [Image: Malwarebytes Anti-Malware Setup Wizard]](http://malwaretips.com/blogs/wp-content/uploads/2014/02/malwarebytes-anti-malware-2-0-installation.jpg)
To install Malwarebytes Anti-Malware on your machine, keep following the prompts by clicking the “Next” button.
![Malwarebytes Anti-Malware Final Setup Screen [Image: Malwarebytes Anti-Malware Final Setup Screen]](http://malwaretips.com/blogs/wp-content/uploads/2014/02/malwarebytes-anti-malware-2-0-final-screen.jpg)
- Once installed, Malwarebytes Anti-Malware will automatically start
and you will see a message stating that you should update the program,
and that a scan has never been run on your system. To start a system
scan you can click on the “Fix Now” button.
![[Image: Click on the Fix Now button to start a scan]](http://malwaretips.com/blogs/wp-content/uploads/2014/02/malwarebytes-anti-malware-fix-now.jpg)
Alternatively, you can click on the “Scan” tab and select “Threat Scan“, then click on the “Scan Now” button.
![Malwarebytes Anti-Malware Threat Scan [Image: Malwarebytes Anti-Malware Threat Scan]](http://malwaretips.com/blogs/wp-content/uploads/2014/02/malwarebytes-anti-malware-threat-scan-option.jpg)
- Malwarebytes Anti-Malware will now check for updates, and if there are any, you will need to click on the “Update Now” button.
![Click on Update Now to update Malwarebytes Anti-Malware [Image: Click on Update Now to update Malwarebytes Anti-Malware]](http://malwaretips.com/blogs/wp-content/uploads/2014/02/malwarebytes-anti-malware-2-0-update-now.jpg)
- Malwarebytes Anti-Malware will now start scanning your computer for
the pop-up virus. When Malwarebytes Anti-Malware is scanning it will
look like the image below.
![Malwarebytes Anti-Malware while performing a scan [Image: Malwarebytes Anti-Malware while performing a scan]](http://malwaretips.com/blogs/wp-content/uploads/2014/02/malwarebytes-anti-malware-scan.jpg)
- When the scan has completed, you will now be presented with a screen
showing you the malware infections that Malwarebytes’ Anti-Malware has
detected. To remove the malicious programs that Malwarebytes
Anti-malware has found, click on the “Quarantine All” button, and then click on the “Apply Now” button.
![Remove the malware that Malwarebytes Anti-Malware has detected [Image: Remove the malware that Malwarebytes Anti-Malware has found]](http://malwaretips.com/blogs/wp-content/uploads/2014/02/malwarebytes-anti-malware-potential-threat-detected.jpg)
Please note that the infections found may be different than what is shown in the image. - Malwarebytes Anti-Malware will now quarantine all the malicious
files and registry keys that it has found. When removing the files,
Malwarebytes Anti-Malware may require a reboot in order to remove some
of them. If it displays a message stating that it needs to reboot your
computer, please allow it to do so.
![Malwarebytes Anti-Malware asking to reboot your computer [Image: Malwarebytes Anti-Malware while removing viruses]](http://malwaretips.com/blogs/wp-content/uploads/2014/02/malwarebytes-anti-malware-remove-virus.jpg)
After your computer will restart, you should open Malwarebytes Anti-Malware and perform another “Threat Scan” scan to verify that there are no remaining threats


0 comments:
Post a Comment